
HDV Cameras and Transfer to 35mm Film
The Sony FX1 and Z1U have the potential to create a much sharper image for transfer to film than any DV camera. The frame size is 1440 by 1080, over four times the number of pixels as an NTSC camera. The cameras do not a have a high-quality 24P or 25P shooting mode, however interlaced video can be converted to 24P or 25P using DVFilm Maker, with excellent results.
The converted 24P/25P footage can be created with any suitable AVI or Quicktime codec/format, including Raylight AVI or Apple HDV codec, and then edited with any AVI or Quicktime-capable editing system such as Premiere Pro, Vegas, Avid or Final Cut Pro. The frame size stays at 1440 x 1080 or is stretched to 1920 x 1080.
There is a great advantage to converting the footage to true 24P/25P quicktime before editing. The conversion to 24 fps is cleaner and higher quality, especially if slow- or fast motion effects will be applied in editing, vs. doing the conversion afterwards. 24P progressive-scan frames are easier to work with when applying motion graphics, composites, or other visual effects. Also the data size and performance requirements for playback are 20% less than 60i. 24P can be easily converted to NTSC and retain its film-like qualities. 24P can be easily converted to PAL (by slowing down 4%) with very high quality. Also of course 24P is compatible with transfer to film. DVFilm will transfer 1280 x 720, 1440 x 1080 or 1920 x 1080 size frames to 35mm for the same rate as a PAL or NTSC transfer to film, provided the footage is supplied to us as 24P Quicktime or AVI on hard drive, and DVFilm Maker is used to do the conversion before editing. This results in a cost savings of about $10,000 for a feature-length film.
We urge anyone making a feature film with this camera to send us 1 minute of test video before starting your project. The cost of the test on 35mm (silent) is $250.00.
Suggested camera settings:
FX1 Euro model: Shoot HDV-mode 50i (interlaced) 1/50th sec shutter speed.
FX1 US Model: Shoot HDV-mode 60i (interlaced) 1/60th sec shutter speed.
Z1: Shoot HDV-mode 60i (interlaced) 1/60th sec shutter speed.
Other settings are listed here.
Record dialog audio on the camera using a boom mike. The camera uses Mpeg audio compression, but it is high quality compression and more than adequate for spoken dialog. However music and sound effects for the film should be recorded on DAT or MiniDV (i.e. uncompressed) for highest quality.
60i vs 50i
The advantage of 60i vs. 50i is that 60i can be converted directly to 24P, but 50i must be converted to 25P and then slowed down 4% upon projection in a movie theater. The slowdown (from 25P to 24P) is usually not noticable, but it does require that the dialog track be time-expanded by 4% and the music slowed down by 4% as well, before the 35mm soundtrack is made, to keep it in sync. There's no other advantage to 60i, the resolution is the same as 50i.
Suggested Post production with Windows and Raylight AVI
Raylight is our HD codec that works with popular editing systems like Sony Vegas and Adobe Premiere. It uses DVCPRO-HD (SMPTE standard 377M) that was developed for the Panasonic Varicam HD camera. However Raylight AVIs can be edited on low-cost computer systems since it uses a lo-res proxy during the editing process (called Raylight Red). We suggest that you capture clips from your HDV camera, convert it to 24P Raylight AVI, do all your ediitng with Raylight+Vegas or Raylight+Premiere at 24P, and then export a 24P uncompressed AVI for transfer to film. Here is the suggested workflow:
Other HDV Cameras
Other HDV cameras like the JVC HD100 can be used in a similar fashion. For the JVC HD100, shoot 1280 x 720 24P, and convert the captured Mpeg-2 clips to Raylight AVI at 1280 x 720 24P using DVFilm Maker (see here for details). The rest of the editing process is the same as described in the Raylight Tutorial.
Suggested Post production - Macintosh
For the Mac you capture into Quicktime HDV compression format using Final Cut Pro 5. Then use DVFilm Maker to convert to 24P Quicktime with HDV compression.
More information coming... here is an open discussion group on the FX1.
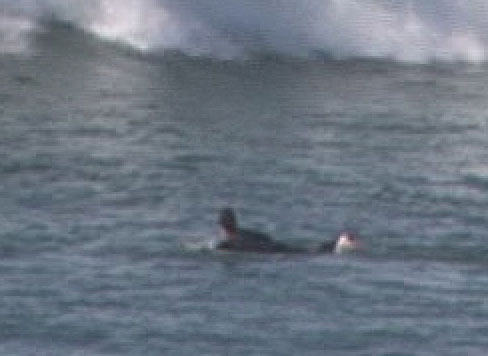
Below is a (very) small portion of an HDR-FX1 frame shot at 50i, cropped and enlarged 200%:

Below is the same frame, now processed with DVFilm Maker to make 25P. Nearly all the interlacing has been removed, but without a loss in sharpness for the overall frame:
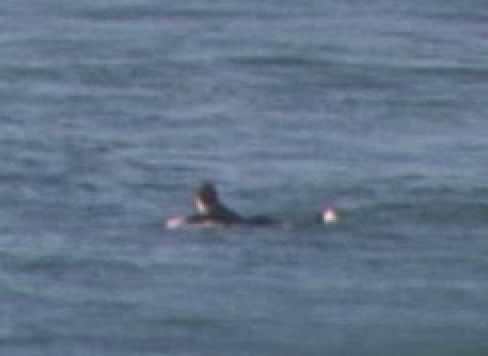
Below is the same surfer shot a few moments earlier in CF25. Note the loss in sharpness. This is why we do not recommend shooting in CF25, CF24 but instead shoot in 50i or 60i.
Join the discussion group on DVFilm transfers and DVFilm software, click here.
People often misspell the name of this product DVFilmmaker -- so here it is for the search engines.