
| For Sony Vegas, we recommend using direct import of the P2 MXF files into your Vegas project. This is the easiest, most efficient method. Go to Raylight Vegas Plug-in to read about how to import the MXF files directly into Vegas.
For all other applications or if you are using a slower computer, you can choose to convert the MXF files to Raylight AVI's for editing. Please note: Raylight AVI's are only support in 32-bit programs. If you need to use Raylight Red, or use versions of Adobe products CS3 or older, Windows MovieMaker or other programs, here is how to convert the MXF files to Raylight AVI: |
|||||||||||||||||
 |
|||||||||||||||||
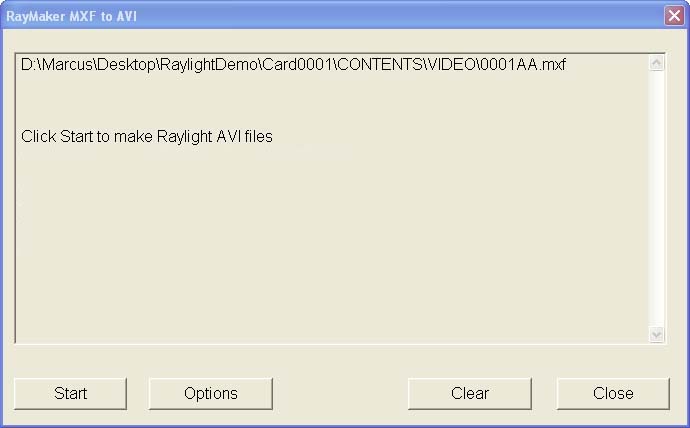
| Step 5: Connect the camera to your USB port and drag the CONTENTS folder of the P2 card to your media hard drive. Start the RayMaker application (see at right). Then drag the CONTENTS folder to the RayMaker screen. (Note the LASTCLIP.TXT file is not needed).
If you use a Firestore FS-100, record to MXF files and use the "Organize P2" option on the Firestore. If you don't have a camera, download the sample CONTENTS folder from our website and use that in place of a real CONTENTS folder file from the camera. The VIDEO or AUDIO folders, or individual MXF files can also be dragged in to RayMaker. |
|||||||||||||||||
 |
|||||||||||||||||
| Step 6: The windows shown at left will appear when the P2 folder or MXF file is dropped in.
Click on Options to set the conversion options if required, then hit Start. Note: If you are using Vista or Windows 7, you may have to disable the User Account Controls (UAC) before Raymaker will function properly. If you change your mind your can Clear the list of files, or add ones to it by dragging them in. Or cancel the operation by clicking on Close. |
|||||||||||||||||
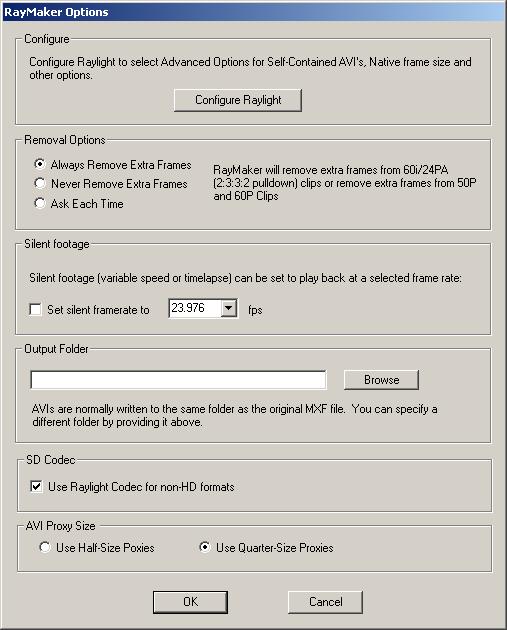
| Step 7: Click Options on the window above to see the RayMaker Options popup at right.
Configure: Click "Configure Raylight" to select the output folder for Raylight system files if you did not already do so in Step 4 (Part 1). Removal Options: Select "Ask Each time" if you are a beginning user. Output Folder: Leave the folder selection window blank for beginning users. The Raylight AVI's will be stored in the same folder as the MXF files. SD Codec: Leave "Use Raylight Codec for non-HD formats" checked for beginning users. If you uncheck it, Raymaker will use the Matrox VFW codecs for the SD Codec. AVI Proxy Size: Set to "Use Quarter-Size Proxies" for beginning users. Note: If in the Raylight Control Panel, "Make Self-Contained AVI" is selected, this function will be overridden. Click OK to save your options. |
 |
||||||||||||||||
 |
|||||||||||||||||
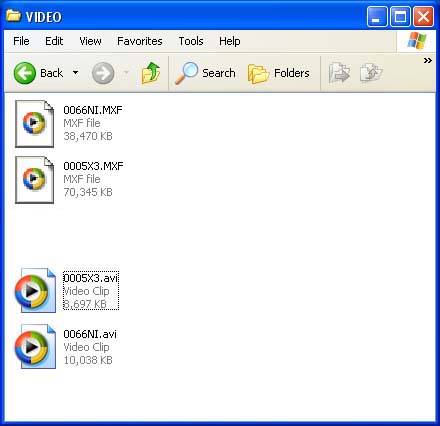
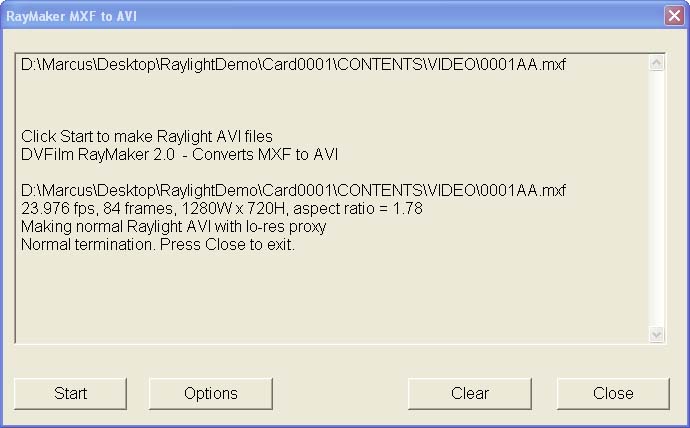
| Step 8: Click Start on RayMaker to convert the MXF files to Raylight AVI.
See the results at right in the VIDEO subfolder. Tip: To see the file extensions in Windows, select Tools->Folder Options->View, and unselect (uncheck) the check box for "Hide File Extensions for Known File Types" At left you can now see the file extensions, .MXF for the original clips and .avi for the Raylight AVI's. |
|||||||||||||||||
| (Technical Detail: You'll notice the file size of the Raylight AVI's are a lot smaller than the MXF files. That's because the Raylight AVI is a Transparent Proxy. That means that it holds a low-res version of the clip that is used for playback on low-cost computer systems (Raylight Red). But each frame in the AVI also contains an invisible link to the original frame data in the MXF file. This link is used by the Raylight codec to get the full-quality frame data for use in the Raylight Violet quality mode.) | |||||||||||||||||
| When RayMaker is running, you'll see a Console Display like this (at right) with a progress bar.
If the file contains 1080 line 60i format video (29.97 frames/sec), you will be asked if you want to remove any 2:3:3:2 pulldown. Click yes if the clip was shot in 1080-24PA mode (24P with 2:3:3:2 pulldown). This pulldown remove feature can also be used for DVCPRO50 and DV shot with 24PA. RayMaker can also remove extra frames from variable speed footage recorded in 720P/60 or 720P/50. |
 |
||||||||||||||||
| RayMaker will convert every MXF file in the video folder. If it needs access to the MXF files in the AUDIO subfolder, it will automatically find them. RayMaker will automatically skip any file in the folder that is not an MXF file. If there are any audio MXF files in the folder, RayMaker will convert those to WAV files.
If you shot DVCPRO50 or plain DV (DV25), RayMaker can also convert those to self-contained AVI files using the Matrox DVCPRO50 or the Microsoft DV codecs, respectively. |
|||||||||||||||||
|
When RayMaker is finished you will see AVI files with the same file name as the MXF files. See at left (bottom two files).
DO NOT REMOVE, RENAME OR DELETE the MXF files. They will be used by Raylight for the final rendering of your movie. You can view the AVI files by double-clicking on them to open them in the Windows Media Player. Hint: you will get smoother playback in the Windows Media Player (WMP) by using 50% size setting. The Raylight Control panel will also allow you to control the quality in WMP. But do not use WMP to judge the fine quality of the video, but rather use the clip viewer in your video editing system. |
||||||||||||||||
| (Technical Detail: If you ever need to rename or move your folders on the media drive, you can easily remake the Raylight AVI's by dragging the folder into RayMaker. You can also move the Raylight AVI's to anywhere on the Media drive, but in this case your editing system will have to reconnect media (find the AVI's)in their new location.)
RayMaker will also create the AVI's in any folder of your choosing, with the "User Selects Folder" option. RayMaker can also create self-contained Raylight AVI's that can be moved from one computer to another without the MXF files. But do not use this feature until you have experience with Raylight, as self-contained Raylight AVI's may not play back in real time on computers without dual (striped) disk drives. The self-contained option is located in the Raylight Configuration screen (see Part 1). |
|||||||||||||||||
|
OR |
|||||||||||||||||