DVFILM EPIC FOR MAC I (Release 1.0)
Requirements
Epic requires Mac OSX 10.4 or later version and Quicktime 7 or later version. Final Cut Pro 6, 7, or later versions can be used. Epic will run on either PowerPC (G5, G4) or Intel processor.
Installation
Unzip the file that you downloaded from our website or online store. Double-click on the installer package and the installer will run. When installation is finished, double-click on the DVFilm Epic for Mac Icon in your /Applications folder or drag it into your Dock. When you first run the program (release version only) you will be prompted for your serial number, or you can request it be emailed to you automatically. If your computer is online you can request your activation code automatically. After that, there is no requirement to have the computer online and no further action is required to use the software. The Demo version does not require activation.
Using Epic to Edit DSLR Quicktimes
How Do You Use It?
Epic for Mac provides real-time, multi-stream playback of DSLR Quicktimes using the DVFilm Epic component, Final Cut Pro, and the FCP RT Extreme feature.
The workflow for editing is as follows:
1) Set up FCP for editing. Open a new sequence using File->New->Sequence, then using the RT button on the FCP Sequence window, set up RT Extreme to the following settings as shown below:
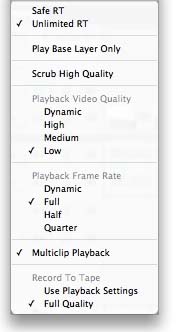
- Unlimited RT - checked
- Playback Video Quality = Low - checked
- Playback Frame Rate = Full - checked
- Multiclip Playback - checked
- Record to Tape = Full Quality - checked
- All other options unchecked
2) Scan your clips. Rather than using File->Import to import your clips, start the Epic for Mac application in your /Applications folder. After you start it, you may wish to keep Epic for Mac in your Dock by clicking on the Roman Column icon in the Dock, holding it down, and selecting Options and then Keep in Dock. Drag your folder containing clips into the Epic for Mac window, or use File->Open Folder. Then hit Scan Now.
3) After Epic scans your clips, which will take a few seconds per clip, it will automatically import them into Final Cut Pro. You will see the dialog below:
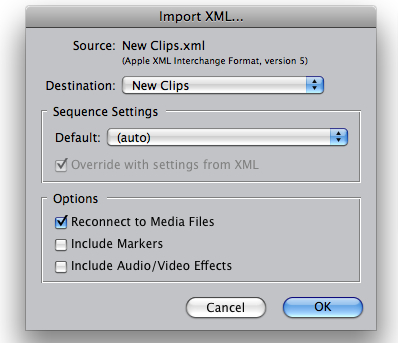
Make sure the ???Reconnect to Media Files??? option is checked.
Click OK if you want to import the clips, Cancel if you do not.
The clips will now assemble into a new bin called "New Clips" or they will import into your existing bin if you selected that.
5) You may then drag the clips into your timeline and start editing.
6) When you drag a clip into the sequence, a progress bar will appear showing that Epic is preparing the clip for real-time playback. It is NOT necessary to wait for this progress bar to finish. You may do many editing tasks such as:
- annotate your clip
- trim it in the sequence or trim it using the clip viewer
- apply an effect and/or a filter to the clip
- set transitions between clips
- etc.
Many of the RT effects such as frame reposition, blur/sharpen, color correction, etc can be used on the clip and FCP will still be able to playback in real time. You will see the colored line above the clip turn orange when effects are being used.
6) A clip will show a red frame around it in the Canvas, if it is in the Epic Real-time mode. Playback and scrubbing will be smooth when the red frame is showing.
7) Epic processes the clips for real-time playback in the order that you drop them into the sequence. So for best workflow, you should drop 2 or more groups of shots into the sequence, then begin your rough cut on the first group. By the time you have roughed in those clips, they will be ready for real-time playback. By the time you have finished fine-cutting those clips, the rest of the clips will be ready for real-time playback. If, after you have assembled your rough cut, you do the fine-cutting from beginning to end of the sequence, there should be no waiting to get real-time playback.
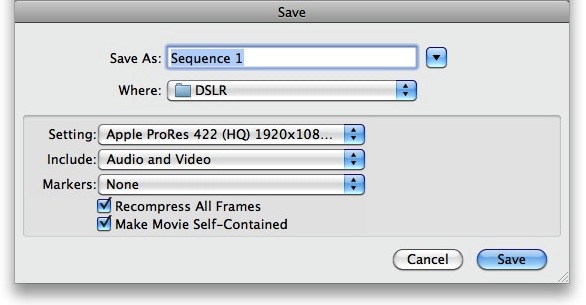
8) Exporting - Use File->Export->Quicktime Movie to export your edited movie. For "Setting" do not use "Same as Sequence" but instead select the preset for ProRes HQ, ProRes LT, or H.264 for most purposes. Also select "Recompress All Frames" and "Make Movie Self-Contained." See below.
Epic will automatically disable the red frame and the RT mode when you export a sequence, there is no need to disable Epic or change the RT mode before you do that.
Important Note: Epic "overrides" the ProRes 422 decoder, so Quicktimes encoded with ProRes 422 cannot be played back with Epic installed. However ProRes 422 (HQ), ProRes 422 (LT), or ProRes 422 (Proxy) are OK. If you should happen to have a vanilla ProRes 422 Quicktime, remove Epic to play it back or transcode it to ProRes 422 (HQ), then re-install Epic.
An alternative Epic component is provided in the Alternative folder in your Epic install folder. This version does not override the ProRes 422 decoder, but instead overrides the AVC-Intra 1080/24P codec. It will only work with Final Cut Pro 7, and 1080-line DSLR clips (but any frame rate). To use it, copy the DVFilmEpic.component file to your main drive's /Library/Quicktime folder, and overwrite the existing DVFilmEpic.component file. You will need to restart FCP for the change to take effect. Rescanning your clips should not be necessary.
9) Looking at frames in Detail
If you need to examine frames in full detail, for example to judge the fine focus of a shot, then switch the RT mode to "Scrub High Quality". To view the entire movie in full quality, real time, then export the project in ProRes (HQ) format, or some other suitable format and view using the Quicktime player.
10) Saving/Archiving Your project
If you move or copy your project to another folder or disk drive, or you rename the folder with clips or folders containing folders of clips, or you rename the drive containing the clips, then the clips must be re-scanned by Epic for Mac. Do this by selecting the "Overwrite Clips" option in the Epic General Options tab, drag the renamed folder or the folder in its new location into Epic, make sure it is the only folder selected, then click "Scan Now". Do not import the clips into FCP. Instead, open your new project in its new location. Help Final Cut Pro find the new location of your clips. Then save the project.
11) More tips
When the Epic Server is making the Epic RT files, it runs at a low priority so not to interfere with normal editing. However, you can click on the Progress bar and speed up processing by about 50%. This is useful if you are going to leave the workstation, for example, and the computer will be otherwise idle, or if you absolutely have to get real-time playback on a clip as soon as possible. If the progress bar window loses focus again, the processing speed will drop back to normal.
Technical Discussion - How Does Epic Work?
1. You provide your folder of clips to the Epic for Mac application, and Epic scans the folder for Quicktime files. Two subfolders are created, the EPIC subfolder, and inside that, the RT (real time) folder. When each of your clips is scanned, Epic creates an Epic Link Quicktime file in the EPIC subfolder, and an RT (real-time playback) Quicktime file in the RT subfolder. At this point the RT file is just a stub, it has no video data in it.
2. The Epic Link file is the file that is imported into FCP. If you use the "After Scan, Import Clips into FCP" feature, the Epic Link files are automatically imported into FCP. If not, then you must use File->Import->Files in FCP to import the Epic Link files (the files in the EPIC subfolder). You cannot, or should not, try to import the original files nor the RT files. If you do that, Epic will not work. Always import the EPIC link files.
3. The Epic Link files contain all the information the Epic codec needs to either playback from the original DSLR files or the RT files. It can switch back and forth between them, even in the middle of playback, as required.
4. When the clips are placed into your sequence, and the RT Extreme feature is set to 1) Scrub High Quality OFF and 2) Low Quality Playback, then Epic will start making the RT file for each clip that is in the sequence. The RT file is actually created by a background process called EpicServer. EpicServer runs in the background and is automatically started.
5. While the RT files are being created, you can continue to do most editing tasks.
6. After the RT file is finished for each particular clip, then the playback becomes real time for that clip. You can tell when the RT mode is working, because Epic draws a red frame around the clip. Epic know when to use the RT file when Final Cut requests a half-sized frame. Half-sized frames are used in the RT Low Quality mode.
7. Many of the RT effects such as frame reposition, blur/sharpen, color correction, etc can be used on the clip and FCP will still be able to playback in real time. You will see the colored line above the clip turn orange when effects are being used.
TroubleShooting Guide
Problem: there is a warning about illegal characters. Solution: rename your folder or volume (card or disk drive name) using characters A-Z, a-z, 0-9.
Problem: there is a warning about folder names too long. Solution: rename your volume (card name or disk drive name) using 31 characters or less.
Problem: I moved the Quicktime files to another computer and now the links do not work. Solution: after moving the files to the second computer, delete the EPIC subfolder and rescan the files with Epic running on the second computer. Reconnect the links in FCP so that FCP can find them in their new location, and save the project. Then if the project needs to be moved to another computer, move the drive in its entirety to the other computer without changing the volume name, or if the files must be copied or uploaded to a server, copy the entire contents of the drive and use the same volume name for the destination drive.
Problem: I removed the Quicktime files and I'm done editing them, but when I start FCP it keeps trying to search for the files and hangs up. Solution: clear out your FCP preferences. Open a Finder window and go to your home folder (the house icon). Double-click on the Library folder, then the Preferences folder, then the Final Cut Pro User Data folder. Drag the Final Cut Pro 7 Preferences file to the trash. Then restart Final Cut Pro. In the future you can prevent this from happening by closing any Projects or Tabs in Final Cut Pro that use those files, before deleting them.
Problem: I need to Un-Install Epic
Solution: Should you ever need to un-install Epic, there is a script file called UnInstallEpic.sh included in the zip file that downloaded with the Epic Installer. To remove Epic, first quit all applications that use Quicktime, including Final Cut Pro and the Quicktime Player. Double-click on the UnInstallEpic script file to run it and remove Epic from your system. Note that the un-installer does not remove the Epic links, data files, options, or registration. Those can be manually deleted by removing the /Users/Shared/DVFilmEpic folder, and deleting any EPIC folders that appear in folders with your clips.
More Questions? Go to DVFilm.com and click on Support, Support Request.
c.2010 DVFilm