RAYLIGHT FOR MAC 3.0
What's new in 3.0
- Scan AVC-Intra MXF files as well as other P2
formats
- Import clips automatically into FCP, organized
by MetaData
- MetaData appears in the clip bin and can be
customized
- Quick and Easy Activation
- Bug Fix: Paths to MXF files are now checked for
illegal characters
- Bug Fix: 4-track audio now exported correctly
for DVCPRO50 P2 Cards
- Other minor fixes.
Requirements
Raylight requires Mac OSX 10.4 or later versions (Tiger, Leopard, and Snow Leopard). and Quicktime 7 or later version (including Quicktime X). Any version of Final Cut Pro 5 or later versions can be used. Raylight will run on either PowerPC (G5, G4) or Intel processor. FCP 7 and Intel processor are required to play back AVC-Intra.
Installation
Raylight requires no installation step. However when you first run the program (release version only) you will be prompted for your serial number, or you can request it be emailed to you automatically. If your computer is online you can request your activation code automatically. After that, there is no requirement to have the computer online and no further action is required to use the software.
Using Raylight to Import MXF Files
Insert a P2 Card other device into the computer, or through an external device through the USB2 port. Start Raylight and select "Show MXF options" and select "Scan Removable Media." Or, attach a hard drive containing P2 data, and drag the folder containing your P2 card images into the Raylight window. Click "Scan Now."
Raylight will scan the cards or drives for video MXF files, and then create MXF file links. Where those links are stored depends on several options, see Link Storage Options below. However, in any case, the clips will be imported into FCP if the "After Scan, Import into FCP" option is selected.
Need to scan other locations for MXF files? Read the section "Other Locations" below. The process should take no more than a few seconds. The links appear as Quicktime files but they do not contain any audio or video data, they are just links (Aliases or Data References) to the data in the MXF files. Do not move or delete the MXF files after you have scanned them. Do not rename the volume name of external drives or P2 cards. If you do move the MXF files, or rename the external drive or P2 card, they must be rescanned. The link files (extension .MXF.mov) can be opened with Final Cut Pro and can be edited as normal. You can also double-click on the link files in Finder to play back the clip in the Quicktime Player. With the “After Scan, Import into FCP” option the clips will automatically be imported into the currently open FCP project, or into a new project called "New Clips" if FCP is not running.
Pulldown Options
24PA pulldown, also known as 2:3:3:2 or "Advanced Pulldown", can be removed from 1080i/60 and 480i/60 (NTSC DV, DVCPRO, DVCPRO50) clips, if the "Remove Pulldown" option is selected. You can also use this option to remove 3:2 or 2:2 pulldown from footage recorded at 60P, or 2:2 pulldown from 50P. Be sure to set the Target Frame Rate in the drop-down selector box to 23.976, 29.97, or 25 fps as appropriate. The "Set Frame Rate" option should NOT be used unless you want to change the speed of motion (see next paragraph).
Changing Silent Frame Rate
Select the "Set Silent Frame Rate" option to change the frame rate of slow motion or fast-motion (time lapse) video to be the same as the frame rate in the drop-down selector box. This option only works with silent clips. For example silent 720/60P footage can be slowed down to 24P for editing.
Background Scanning
Checkmark "Scan in Background" to have Raylight scan all volumes every 10 seconds. Raylight will not overwrite existing links to save on system resources and also to not interfere with the use of the links, so this background scanning can safely be used during editing and other video work. Raylight WILL overwrite the links if you do a manual scan (by clicking the Scan Now button) AND you have the "Overwrite Existing Links" option selected.
Note that starting with version 2, in background scanning mode, Raylight also checks the /Users /Shared /Raylight /Quicktime folder for quicktimes that you exported from FCP (see P2 Maker below).
If you do not wish to scan any P2 Cards you can turn off the “Scan Removable Media” option in the Scan Filter Options tab of the MXF options drawer. You can selectively scan specific folders by including folders in the Other Scan Locations (see below). This scanning of removable media or "Other" folders includes all subfolders. The 2 level limit of previous versions has been removed.
Other Locations
Locations other than P2 Cards, or external drives containing P2 Card
images (for example a P2 folder on your desktop), may be scanned by adding them
to the "Other Scan Locations" list.
Link Storage Options
If you select "Store Links in Same Location as Source Files" then the links will be stored in the same folder as the video MXF files. This can make it easier to organize the links. You can also choose "Store Links in Root of Card Images" and they will be placed in the same folder as the CONTENTS folder of each card. If neither of these options are selected, the links will be stored in the /User/Shared/Raylight folder on your system drive.
The links created by Raylight may be copied or moved to any other part of your computer, including other disk drives, and they will function normally.
If the MXF files are copied or moved anywhere, however, then you must remake the links by clicking "Scan Now." Use the "Overwrite Existing Link Files" option if you need to replace existing links with new ones. In some cases an old link will still function but there is a delay of several seconds while the system searches for the MXF files. If this happens in the Quicktime Player, you can save the link using File->Save and the link will be updated. If it happens in FCP, open the link with QT Player, then File->Save the link.
Limitations of the Demo Version
Note that the demo version cuts the video and audio off at about 10 seconds into each clip. In the release version, you get the entire video track, and all four audio tracks are linked.
Metadata Options
Raylight reads the .XML files in the CLIP folder to get timecode, pulldown, and metadata. The metadata can be viewed in the Quicktime Player "Movie Properties" if you have the Quicktime Pro license enabled, or in the first or second frame of video by means of a video slate generated by Raylight. If the "Create Metadata Slate" is selected, the slate is written over the first frame of picture so it does not change the length of the clip or affect the soundtrack. If you have the "Frame 2" option selected, the slate replaces frame 2 instead (so that frame 1 will appear as the thumbnail in FCP). If you have a clip that was recorded across more than one MXF file, the slate will only appear on the first file, unless "Always Slate" is selected. Note that the Metadata Slate feature does not work with AVC-Intra MXF files, however you can view Metadata in the clip bin, see section below on MetaData in the FCP Bin.
Clip and Folder Naming
Raylight will place the User Clip Name from the metadata in the file name if that option is selected. In the camera select Type 2 metadata so that the User Clip Name will be automatically incremented on each take. Raylight will also put the clips into a folder based on the Program Name metadata item, if "Create Folders by Program Name" is selected, or by the Volume Name (Card Name or Disk Name) if "Create Folders by Volume Name" is selected. Or both if selected. One suggested use is to use Program Name for the title of a movie, and User Clip Name for the shot number, eg "23A Take ". Another option is to use Program Name for the scene, and simply "Take " for User Clip Name. The camera will append 0001, etc to the name (if Type 2 is selected).
Note that if the Folder naming options are used, then the folders are always stored in the /Users/Shared/Raylight folder.
Automatic FCP Import
Raylight will automatically import the clips into FCP if you have the “After Scan, Import into FCP” option selected. We recommend that you set your clip bin in the list view before using this feature. Click “Scan Now” on the Raylight panel or if you are using the background scanning, connect your P2 card or external disk drive to the computer. After the clips are scanned you will see a dialog in FCP to confirm the import of the new clips.
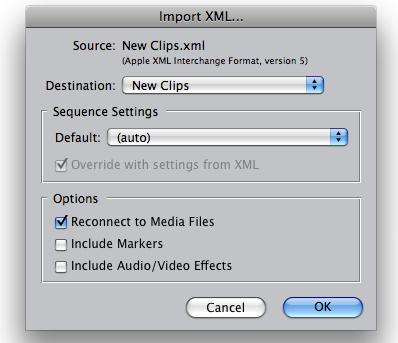
Make sure the “Reconnect to Media Files” option is checked.
Click OK if you want to import the clips, Cancel if you do not.
Note that if you are using the Folder Naming options, the clips will appear in the bin inside sub-folders with the same name as the metadata (Program Name and/or Volume Name as selected).
MetaData in the FCP Bin
If you use the Automatic FCP Import feature, in addition to the usual information in the bin on frame rate, timecode, frame size, etc. you can also get P2 Metadata in the bin. The P2 Metadata is mapped by default per the following table:
|
FCP Bin Column |
P2 Metadata Tag |
|
scene |
SceneNo. |
|
shottake |
TakeNo. |
|
lognote |
Text |
|
label |
Creator |
|
label2 |
PlaceName |
|
mastercomment1 |
CreationDate |
|
mastercomment2 |
Shooter |
|
mastercomment3 |
Reporter |
|
mastercomment4 |
Purpose |
You can also specify any P2 Metadata field for the above table, plus some other columns in the bin that are not shown above. This is done by editing the plain text file called MetaMap.txt, which you will find in the Library/Preferences/DVFilm folder in your user folder. A sample file is provided for you after the first time you run the Raylight program. The format of the file is as follows:
FCP Bin Column = P2 Metadata Tag
For example, three rows of the file read:
scene= SceneNo.
shottake=TakeNo.
lognote=Text
Note that the names on the left-hand side of the ‘=’ sign do not exactly match the column headings in the bin. You must use the column heading names that are provided in the file. Also note that the P2 Metadata tags appear without brackets (< and >) but otherwise must appear exactly as they do in the P2 XML files. If you need more assistance with custom mapping of metadata, contact DVFilm Support and request the “Guide to Custom Metadata Mapping, Raylight for Mac”.
Suggested Workflow
Here is a suggested workflow to improve your productivity and take advantage of the features of Raylight.
1. The cameraman or assistant camera uses a Mac laptop computer and P2 CMS software (free from Panasonic) to backup the card onto hard drive, and fill in any metadata items such as ProgramName (e.g. "MyFeatureFilm"), UserClipName (e.g. "Scene 23 Take 5"), etc. and give a name to the P2 card, i.e. "MyShootDay1".
2. The backup drive or the P2 Cards are connected to the editor's computer.
3. The editor scans with Raylight using the User Clip Name, Volume Name, and Program Name options. He uses the "After Scan, Import to FCP" option. The shots are automatically organized into a "MyFeatureFilm" folder in the Raylight folder. Inside the "MyFeatureFilm" folder there will be a "MyShootDay1" folder (the name of the P2 Card). The folders appear in the media bin after scanning.
4. Then inside the "MyShootDay1" folder will be a number of .MXF.mov Raylight link files, beginning with "Scene23 Take 5 0001FG.MXF" where 0001FG.MXF is the first clip that was shot on that day.
5. If an external drive is used for editing, then the Raylight links should be moved to the drive and backed up along with the card images. If the drive is moved to another computer, the links will still function as long as the structure of the drive is not changed and the volume name of the drive is not changed. Also the other computer does not need to have Raylight installed. The link files, once they are created, are completely handled by Quicktime without help from Raylight.
Timecode
Raylight converts timecode from the .XML file into Quicktime timecode. If pulldown is removed, the starting timecode is converted from 30 fps to 24 fps format. Because of this you may see a difference between the starting timecode on the metadata slate and the starting timecode as reported by FCP. For example 15 in 30fps format equals 12 in 24fps format.
P2 Maker
P2 Maker is a new feature with release 2. It allows you to create new P2 Cards from FCP. Presently only DVCPROHD, DVCPRO50, DVCPRO and DV formats are supported. Raylight cannot export to P2 cards in the AVC-Intra format. Panasonic provides a free Compressor plug-in for exporting P2 cards in AVC-Intra: see eww.pavc.panasonic.co.jp/pro-av/support/desk/e/download.htm#encoder
To use the P2 Maker function select Background Scanning and export a Quicktime from FCP into the /Users /Shared /Raylight /Quicktime folder. Or, Drop a DV, DVCPRO, DVCPROHD or DVCPRO50 Quicktime into the Raylight window. The P2 Maker drawer will open. Enter any metadata you wish to be stored in the card or press Import Data to copy metadata from an existing .XML clip file. Press Start in the Drawer to start the conversion to P2 Card format.
The Card image will be stored in the Raylight/P2Cards folder. Raylight will also copy data directly into a P2 Card if you wish. Click on Destination Change to change the destination. Be sure the card's write protect tab is in the write position. If you are using the Dual Systems Adaptor (express card to P2 Card adaptor) be sure to install the appropriate drivers. If the P2 Card is in the camera, install the Panasonic P2 card drivers and use the USB connection instead of Firewire (Firewire connection to the Mac is read-only). Also your camera must be updated to the latest firmware, (the version that supports 16GB P2 cards). Consult your camera manual for more information on using the camera's "PC Mode" for reading and writing to the P2 Cards.
You may change the folder that Raylight scans for new Quicktime files to appear. Click Scan Folder Change button. Use Reset to back to the default location. Select Open to load a new quicktime file.
Select the Clear button to clear the current quicktime file loaded and any meta data fields. If background scanning is enabled the same file cleared will be rediscovered. You can use the Skip button to skip the currently loaded or discovered file and it will not get rediscovered.
Note the audio format in the QuickTime must be uncompressed ("Linear PCM") 16-bits/sample. One stereo or 4 mono tracks are acceptable. These are the defaults settings for exported DVCPROHD projects.
Starting with version 2.07, file locks on the P2 Card folders and files are automatically bypassed by Raylight so you do not need to remove them yourself.
Limitations
Do not use Disk Images (dmg) with MXF files to edit with Raylight. There will be a 100% performance penalty due to the way the links are de-referenced by Final Cut Pro and Quicktime, which means you may not have real-time playback. Instead use your MXF files in a CONTENTS/VIDEO folder just as they would appear in a P2 Card folder, and put the CONTENTS folder in the root folder of your system drive, P2 Card, or media hard drive.
Currently Supported formats: both DVCPROHD and AVC-Intra 1080i60, 1080i50, 1080/30P, 1080/25P, 1080i/24PA, 720/24PN, 720/24P, 720/30PN, 720/30P, 720/25PN, 720/25P, 720/60P, 720/50P, DVCPRO50 60i/NTSC, DVCPRO50 50i/PAL, DVCPRO50 60i/24PA, DVCPRO50 50i/25P, DV-PAL, DV-NTSC, DVCPRO PAL, DVCPRO NTSC.
Known Issues
Raylight does not work with non-English characters in volume names, folder names, etc. and the folder names must be less than 32 characters.
You cannot import two P2 Cards or Disk Drives that have the same
exact name. Rename the first one before connecting the second one.
Some really old versions of FCP do not install a version of the Quicktime DVCPROHD
codec that works with Intel processors and the Quicktime player. For example,
if you have FCP 5.0, you cannot play DVCPROHD on an Intel processor, only a
G5/G4 processor. If you are using 720p50 DVCPROHD format, you must have FCP 6
or later.
Known issues with P2 Maker function:
1. Raylight will not split a clip across P2 Cards.
2. Clips that span files (clips that are >4GB) are not logically linked, so FCP and Raylight will not import them as one clip, but as multiple clips.
TroubleShooting Guide
Problem: The .mxf.mov link files created by Raylight for Mac do not display correctly in Lion OSX 7 with Quicktime X. Solution: Use Quicktime 7 for viewing the .mxf.mov files. If you need to download QT7 for Lion, go here: http://support.apple.com/kb/ht3678
Problem: there is a warning about illegal characters. Solution: rename your folder or volume (card or disk drive name) using characters A-Z, a-z, 0-9.
Problem: there is a warning about folder names too long. Solution: rename your volume (card name or disk drive name) using 31 characters or less.
Problem: Raylight does not find any MXF files, and no links appear in /Users /Shared/ Raylight. Solution: be sure to check the output window for messages indicating what files were found or any files that were skipped. Options for Raylight are stored in the file options.txt found in the /Users/Shared/Raylight folder on your system drive. You can set the option LogVerbose to 1 (LogVerbose = 1) to see more detailed information during scanning. In general, it is not recommended you leave this on, important messages will be shown in the output window even without this option.
Problem: clips on 2 identically-named P2 Cards: they play back with noise frames and audio noise. Solution: rename P2 Cards when you connect them so you do not have 2 cards with the same name,
Problem: Raylight creates the links, and I can see the metadata slate, but the video is all white or all black, or random noise. Solution: delete the link and rescan the MXF files. Make sure each folder in the path to your MXF files has a folder name less than 32 characters. Make sure the drive is formatted Mac OS Extended if you use long file names such as file names with the MetaData "User Clip Name". Make sure you have the DVCPROHD components installed by FCP. They are in the Library/Quicktime folder on your system drive, six files that start with "DVCPROHD" or "AppleAVCIntra" and end with ".component"
Problem: I see the clips and the slate in FCP but not in the quicktime player. Solution: no solution right now for Intel processor and FCP 5.0 or earlier versions. Later releases of Raylight will include the DVFilm DVCPROHD codec for systems that do not have FCP installed.
Problem: I moved the MXF files to another computer and now the links do not work. Solution: after moving the MXF files to the second computer, delete the links and rescan the MXF files with Raylight running on the second computer. OR, move the link files so that they live in the same folder as your card images. Reconnect the links in FCP so that FCP can find them in their new location, and save the project. Then if the project needs to be moved to another computer, move the drive in its entirety to the other computer without changing the volume name, or if the files must be copied or uploaded to a server, copy the entire contents of the drive and use the same volume name for the destination drive.
Problem: I removed the MXF files and I'm done editing them, but when I start FCP it keeps trying to search for the MXF files and hangs up. Solution: clear out your FCP preferences. Open a Finder window and go to your home folder (the house icon). Double-click on the Library folder, then the Preferences folder, then the Final Cut Pro User Data folder. Drag the Final Cut Pro 7 Preferences file to the trash. Then restart Final Cut Pro. In the future you can prevent this from happening by closing any Projects or Tabs in Final Cut Pro that use those MXF files, before deleting them.
More Questions? Go to DVFilm.com and click on Support, Support Request.
c.2010 DVFilm